Subpanels come to the rescue when your electrical panel is full, but you need to add more circuits. The subpanel functions the same as the main panel. But what about its grounding? Does it need a ground rod? Let’s figure it out.
A subpanel of any detached building needs a ground rod to protect your home from sudden surges caused by short circuits and lightning strikes near the power line of your home. The grounding rod protects you and the electrical devices of your house from overload.
A subpanel without a ground rod is dangerous. This article provides a complete discussion about the purpose of the ground rod for the subpanel and how to install it correctly. Additionally, I will share some tips to troubleshoot common grounding issues.
Check out our list of top-handpicked products for all your electrical, appliance, and HVAC system needs to keep your home running smoothly.
This post includes some affiliate links.Understanding subpanels and their electrical requirements
The main circuit breaker is the heart of our house’s electrical system.
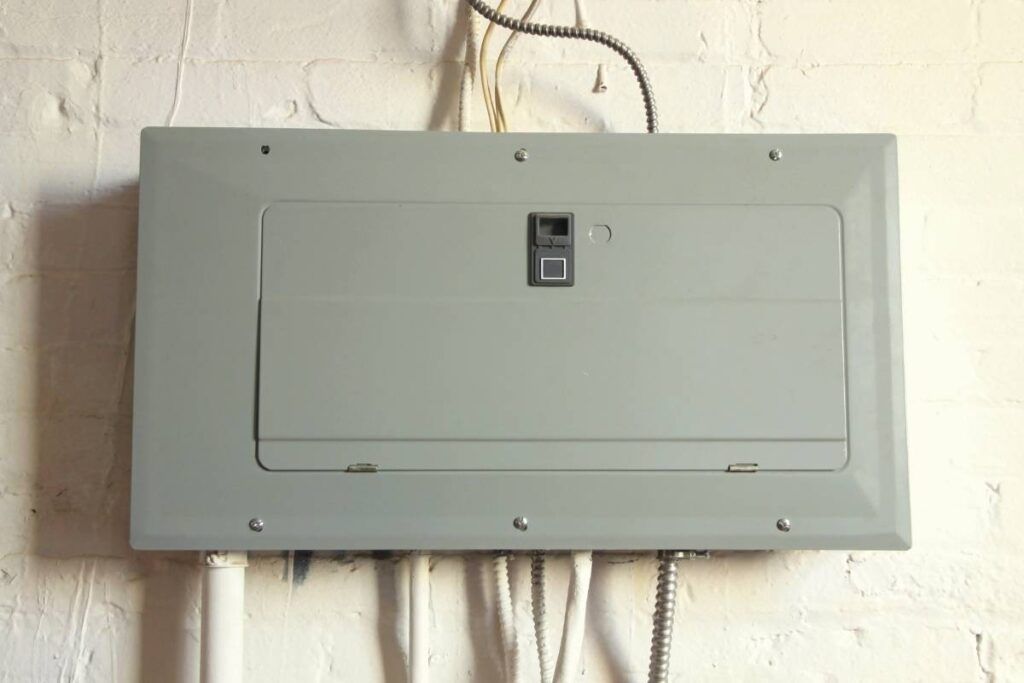
The subpanel is the smaller service panel that circulates energy to some specific places in your house or a separate structure near it.
We need a sub-panel when the main electrical panel is full, but you need to add more circuits to your house.
It works like the main panel and can be placed anywhere inside or outside the house.
There should be at least one foot of distance between the subpanel and the main panel.
The double-pole 240V breaker at the main breaker feeds the sub-panel.
The single feed is further divided into extra branch circuits at the sub-panel.
The subpanels extend the wiring of multiple circuits for a particular place of your house or a detached building away from the main panel.
Installing a subpanel saves a lot of time and construction costs as it reduces the number of home runs back to the main breaker.
The subpanel will need two hot, neutral, and ground wires.
The purpose of ground rods in electrical systems
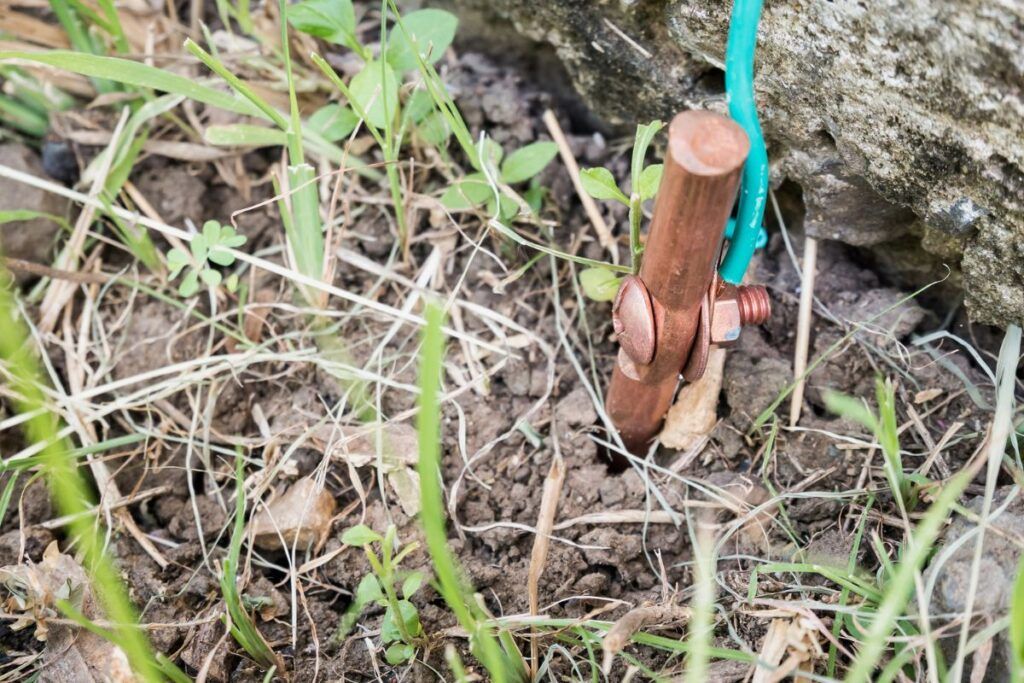
The ground rod is a thick rod connected to the main breaker with a copper ground wire.
The ground rod is connected to the neutral transformer in your surrounding.
You see them buried under the ground near your house.
The ground rod forms an electrical path in the ground that stabilizes the voltage from the power source and dissipates the static discharge voltage to the ground.
The ground rod is an electrical conductor to remove the danger from your house by transferring the incoming electricity during sudden surges or lightning into the ground.
The alternating current, or AC, takes a path back to the source through the transformers.
Then, the CD static discharge will want a route back to the ground or cloud where it all started.
If you have an electrical panel, lightning is the most dangerous thing.
The ground rod can divert the lightning’s static discharge from your roof to the ground safely.
The ground conductor never carries current under normal usage until there is a ground fault or a lost neutral connection.
Do subpanels require a separate ground rod?
Since the subpanels work similarly to the electrical panels, they need a ground rod for protection.
Sometimes, a subpanel may need two ground rods.
The ground rod is vital in dissipating static electricity and high voltages during sudden surges and lightning strikes from your house to the ground.
That is why a ground rod is crucial.
All the subpanels for a detached building will need a ground rod.
In contrast, a subpanel installed in the same building does not need an individual ground rod.
The subpanels in the same building are already connected to a ground wire.
The ground rod plays its main role during a lightning strike or sudden surges.
You will need at least one ground rod for a subpanel in a detached building.
NEC requirements for grounding the subpanel
The National Electric Code, or NEC, has set a grounding rod or plate requirement in the ground for a subpanel at 25 ohms or less resistance in sections 250-56.
Here are some guidelines provided by the NEC about sub-panel grounding:
- The subpanel needs to have a separate grounding electrode system.
- Connect the grounding conductor to the electrode and main grounding bus bar.
- The grounding rod should be at least 8 to 10 feet long.
- The local code tells you to install one grounding rod for each panel. For multiple rods, the distance between each rod should be 6 feet.
- The grounding conductor size should be according to the size of the feeder conductor.
- A separate grounding bus bar should be present for the subpanel bonded to the subpanel’s metal enclosure. It will ensure the ground conductor is attached to the subpanel’s metal enclosure.
- Separate the ground and neutral bars in the subpanel of the same building. Isolate the neutral conductor from the subpanel’s metal enclosure to separate it from the grounding bus bar and prevent their bonding.
- Ground the subpanel’s metal enclosure to the main panel’s grounding electrode system by connecting the grounding conductor from the subpanel’s grounding bus bar to the main breaker’s grounding bus bar.
- The subpanel must have four wire feeders. Old constructions may have three wire feeders. So, check it and fix it.
Alternatives to a ground rod for grounding subpanel
There are multiple alternatives to the grounding rod, and below are some of them:
- One good alternative to a ground rod is to bond the grounding system of the subpanel with a rebar in the concrete foundation and the grounding rings.
- Another good alternative is a surge protector. Surge Protection Devices, or SPD, can protect against voltage spikes and limit the excess current by blocking it and protecting the house from burning the appliances.
- Try a water metal pipe if it enters your building from the outside. The pipe should have certain criteria, though, like coming in direct contact with the earth for 10 feet and continuous electrically.
- A concrete-encased electrode involves installing a metal rod or pipe 20 feet long in the concrete-encased hole. The encasement increases the contact between the surface area and the earth and gives an effective grounding electrode.
- Connect the sub-panel to the existing ground electrode at the main panel with a grounding electrode conductor. The conductor size should match the subpanel’s amperage and the distance from the main breaker.
- Bury a grounding metal plate sized 2 feet wide and 10 feet long in the ground and connect it to the sub-panel with a grounding electrode conductor.
All the alternatives may not work for all the regions. So, confirm it with your local electric codes and then approach them.
Steps to install a ground rod for a subpanel
Grounding a sub-panel with a ground rod is relatively easy. It is similar to the process of grounding the main panel.
Here is a step-by-step guide to installing a ground rod for the subpanel:
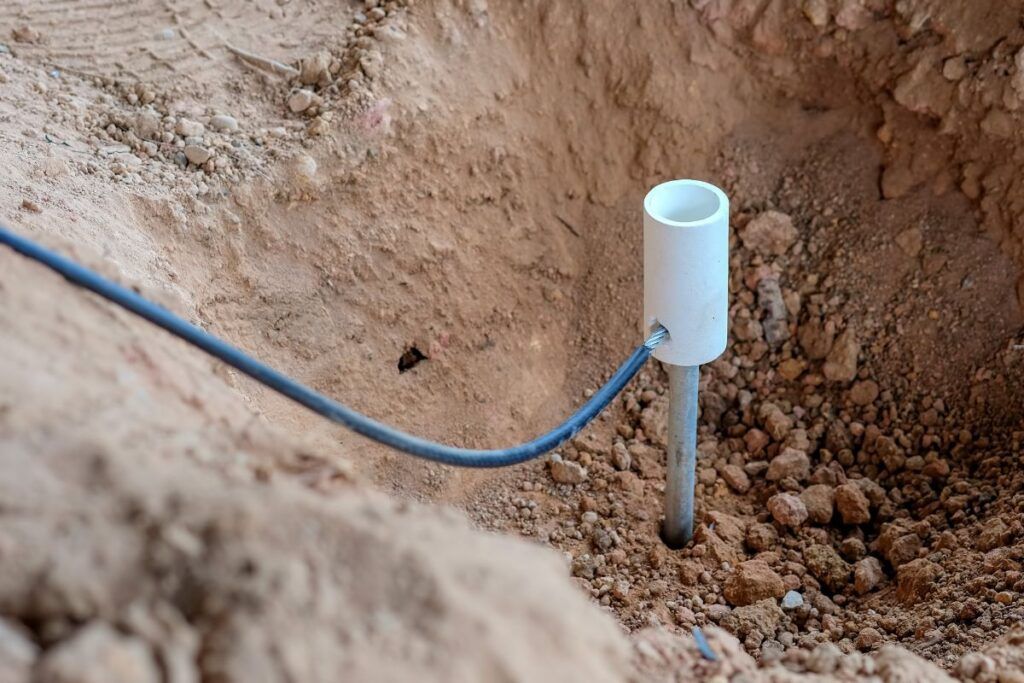
- Find a place that is at least 2 feet away from the building. Avoid areas with water pipelines, gas pipelines, and heavy rock areas inside the ground.
- Choose a high-quality ground rod to insert into the ground. Since the rod will stay for a long time inside the ground, you need a high-quality and durable rod that stays fine under the ground.
- The rod specifications can differ based on your region. For example, the US will have at least 2.4 cm long and ½ inch wide rods.
- Dig around 2.4 meters of ground and insert the ground rod into it.
- Clamp the rod’s upper end with one end of the grounding electrode.
- Connect another electrode end with the subpanel where all the ground and neutral wires are attached.
The steps may feel complicated if you have never seen a grounding rod or an electrode conductor.
So, you can hire a professional to do these connections and install the rod.
Avoid doing anything if you are clueless about the processes and materials.
The subpanel will need a 4-wire feeder with a grounding connector between the main panel and the subpanel.
Do not bond the neutral and ground in the subpanel.
Proper placement and maintenance of the ground rod for the subpanels
Proper placement of the grounding rod is important for its proper maintenance and effectiveness.
The grounding rod should not be too far or close to the main panel.
There should be only 2 feet between your building and the ground rod.
The place you have chosen for the grounding rod should allow you to hammer the rod around 8 feet into the ground.
Avoid rocky or heavily compacted areas for your ground rod because the rod needs to go 8 feet deep into the ground.
Though it is not always possible, you should avoid rocky areas.
While installing the ground rod, ensure that you are not damaging anything under the ground, for example, water or gas pipes.
If you are unaware, call hotlines from utility companies.
The utilities will take 2-3 days to reach your home and find the right ground rod location.
After installing the ground rod, ensure that around 6 to 8 inches protrude above the surface.
Connect the ground wire to the subpanel’s grounding bus bar with a 6 AWG copper wire.
Sometimes, you may have to install two grounding rods for your subpanel, provided the soil condition is poor, and the electrical load of your house is high.
Check the ground rod periodically for signs of corrosion or damage. Such problems should be solved right away.
Also, check the connection between the subpanel and the ground rod to ensure the tightness and security of the connection.
How to test the effectiveness of a sub-panel grounding system?
Once you have installed the ground rod for your subpanel, you must test its effectiveness by measuring the resistance.
You can test the ground rod’s effectiveness with a clamp-on meter, a multimeter, or an earth electrode tester.
Clamp-on meter
A clamp-on meter is an electronic machine that checks the current resistance for a multi-grounded system, not on an isolated ground rod.
The meter can be easy to use but may not give accurate results.
The meter gives readings in Ohms, the unit of resistance.
Press the lever on the meter’s side to open the clamp and put the clamp around the grounding electrode conductor or over the ground rod’s top.
Allow the clamp to close, and let go of the lever.
Clamp the meter near the ground for better results.
Now, turn on the meter. Turning on the meter depends on the brand type.
Some meters will have a button with POWER or ON. Others have a dial to be set to Ohms.
The clamp-on meter contains a screen for reading. Check the resistance reading on the screen.
A lower number means the grounding rod is working better.
Generally, the reading should not go over 25 Ohms.
Multimeter

Using a multimeter can help in measuring the single ground rod’s effectiveness.
Please turn off the power to the sub-panel and the connected circuits.
Disconnect the devices or appliances, too, connected to the sub-panel.
Now, connect the multimeter to the ground bus bar of the sub-panel.
To test the measure of the resistance, touch the multimeter’s black probe to the ground bus bar and the other to the grounding electrode conductor connected to the ground rod.
Check the resistance reading and compare it to the range specified in the local codes.
The ground rod works fine if it is lower than 25 ohms.
Earth electrode tester
This old tester uses multiple probes and wires to access the resistance.
So, using the tester will take longer than the above two users.
Insert the ground probes at specific distances away from the ground rod. The probes are usually 1 foot long.
Keep inserting them unless only the top is visible.
Insert the furthest ground probe at a distance of 10 times the ground rod’s length.
For example, if your ground rod is 8 feet, the furthest should be 80 feet.
The second ground rod should be midway between the furthest probe and the ground rod.
The leads with the electrode testers will be very long, so they must reach the needed distance.
Insert the three leads of the meter into the openings in the meter.
The other end of one of the leads will be connected to the ground rod’s top, and the other two leads to each ground probe.
Usually, it does not matter which lead you connect to the ground probe.
But it would be better to connect the longest lead with the furthest ground probe.
Now, you need to turn on the meter.
Most testers will have a dial to set it to an ohm symbol or a mark mentioning “3 poles”.
It means that 3 points have contacted the earth.
If the ground rods are working fine, the number on the reading screen will be below 25.
To verify the reading, shift one of the probes 2 feet close to the grounding rod and note the reading again.
If all the readings are below 25, your ground rod works fine.
Troubleshooting grounding issues in the subpanel
A ground rod in the subpanel is subject to various issues if done incorrectly.
Here are some troubleshooting tips to examine the problem and solve them:
- Begin with checking all the wire connections, the conductor, the bus bars, and the devices or appliances connected to the sub-panel. Examine and see if there are any loose connections or corroded wires. Tighten the loose wires and clean the corrosion with a wire brush.
- Check the wire to find signs of fraying or damage. Replace them immediately.
- Look for damaged signs in the wires connecting the ground rod and the subpanel.
- Check the electrode conductor and see any corrosion or other damage. Replace them immediately.
- Check the ground rod regularly to ensure that it is firm in its place and there are no corrosion or damages. Replace or repair if you find any problems with the rod.
- Soil is an important factor while installing the ground rod. You should avoid rocky soil for the ground rod. Check the resistance of your ground rod to find out whether the soil is good for it.
- Test the grounding system with an earth electrode tester, a digital multimeter, or a clamp-on tester. It ensures that your ground rod is fine and has no problem.
Final thoughts
The subpanel is installed when the main panel is filled up, and you need more circuits. Since the subpanel works like the main panel, it will need a ground rod for grounding. A ground rod protects your house from sudden surges, short circuits, and lightning strikes by diverting the extra current and the static discharge to the ground. You do not need a ground rod if your subpanel is in the same building.
The grounding in the main panel will be enough. But you will need one for the subpanel in the detached building. Sometimes, you may need two, based on the number of panels. Maintain at least 6 feet of distance between the rods. To install a ground rod, dig a deep hole around 8 feet, insert the ground rod, connect the rod’s top end with the grounding electrode, and the electrode’s other end goes to the sub-panel.
You can check the ground rod’s effectiveness by measuring its resistance with a multimeter, an earth electrode tester, or a clamp-on tester. Properly place and maintain the ground rod and follow the troubleshooting tips if you face any grounding issues.
Can I use two ground rods?
Yes, you can use two ground rods. Generally, the NEC recommends one rod for one sub-panel. So, if you have two subpanels, you can install two ground rods.
Can I wire a subpanel with three wires?
In the 3-wire system, you have two hot and one neutral wire. The grounds and neutrals are connected to the sub-panel. Such a setting was applicable before 2008. Now, you need four wires where you have separate ground and neutral.
Reference: Ground Rod Wikipedia