A pinched wire is a wire that got damaged due to physical pressure. In worse conditions, the wire can break, damage the insulation, and expose the inner wires. So, fix pinched wires whenever you notice them.
Use electrical tape, heat shrink tubing, sugru, or a repurposed spring to temporarily fix a pinched wire. If the wires are badly damaged and need a permanent fix, cut the damaged part and screw them newly in the plug or splice them and connect them with wire nuts or solder.
If the wire’s insulation is not broken, removing the heavy objects and unpinching the wire would be enough. Otherwise, you need temporary or permanent fixes based on the damage level. This guide will share the different ways to fix a pinched wire.
Check out our list of top-handpicked products for all your electrical, appliance, and HVAC system needs to keep your home running smoothly.
This post includes some affiliate links.How to identify a pinched wire: Signs and symptoms
A pinched wire is a wire that gets trapped or compressed between two objects or over a heavy object. It can further damage the wire insulation and break it from the center.
Unless you face issues, you won’t know about the pinching. However, there will be some symptoms that can help you identify the problem:
- If there is a pinched wire, it causes an electric shock. It will interrupt the smooth functioning of the appliance and the circuit. Problems include flickering lights, intermittent power loss, and tripped breakers.
- Pinched wires can cause sparks, especially if the wires inside the insulation get exposed. In that case, you must address the issue immediately.
- When a wire is pinched, it can overheat quickly. It is because the current flow is not smooth, and it gets interrupted at the pinched part. So, the wire can overheat quickly.
- The wire can break or damage if the wire is pinched due to hefty objects. Look for cuts, exposed wires, and breaks and fix them immediately.
- Use a multimeter and test the wire continuity to confirm the problem. There will be no continuity if the wire is damaged or broken somewhere.
Common causes of a pinched wire and how to avoid them
A pinched or crushed wire is compressed or squeezed due to the pressure between two objects or by staying under a heavy object.
If the pressure is light, the wire will squeeze.
If the pressure is too much, the wire can break, damage the insulation, and expose the wires inside the insulation.
Physical pressure
Wire getting compressed or squeezed due to physical pressure is one of the main reasons behind a pinched wire.
The wire becomes difficult to move or shift freely.
It may be present under or between heavy objects for a long time.
That is why the wire gets squeezed or compressed.
Vibration
Suppose the wires are connected to a device that vibrates intensely.
In that case, your wire can be pinched or crushed due to excessive vibration.
Over time, the vibration can damage the wires and even break them.
Abrasion
If the wire is placed in such a location where it gets rubbed by a heavy object or the wall, the wire can be pinched or crushed.
The wire staying against the concrete or metal objects can wear down due to constant rubbing.
Over time, the wire will damage, and the wires inside the insulation will be exposed.
Old wires
When the wires become old, their structure will deteriorate.
Over time, it will become brittle and squeeze at places even with the slightest pressure or rubbing for some time.
Even if the wire is not pinched, they become more susceptible to pinching and squeezing.
Outside factors
Excessive heat can shrink and pinch the wire.
Additionally, exposure to excessive temperatures like cold, heat, moisture, UV rays, or chemicals can weaken the wire insulation and make them susceptible to pinching and crushing.
Tools you will need to fix the pinched wire: Essentials for your toolkit

Fixing the pinched wires can be either temporary or permanent.
Here are some essential tools you need to fix the pinched wires:
- Electrical tape
- Sugru
- Repurposed springs
- Wire strippers
- Wire nuts
- Butt splices
- Heat shrink tubing
- Solder iron
- Hair dryer or heat gun
Quick fixes for a pinched wire: Temporary solutions to get you by
If the pinched wires are squeezed, removing the objects compressing the wire is a straightforward solution.
After that, try unpinching the wire and bending it to return to its original shape with your hands or a pair of pliers.
If the wire is slightly damaged, here are 3 temporary and easy fixes for a pinched wire:
1. Electrical tape

Wrapping the pinched part with electrical tape is an easy fix.
Locate the pinched part and check the damage level.
If there has been a slight pinch or compression, try manipulating the wire to unpinch it.
If there are tiny breaks, wrap the tape around the area 2-3 times.
It will help prevent any further damage to your wire.
Keep the wire in a safe zone where there are no chances of further compression.
For solid safety, make 3 to 4 wraps on either side of the already wrapped part and stick the end on the cable to the damaged part’s side.
It is one of the most straightforward fixes.
I have used this process for fixing pinched wires of several appliances.
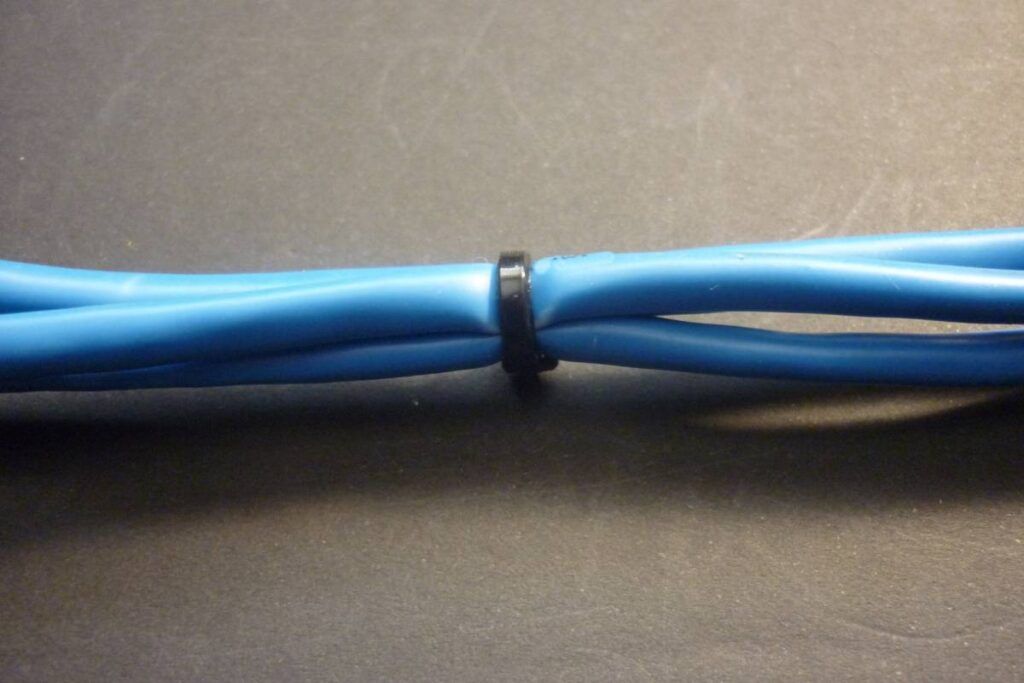
2. Sugru
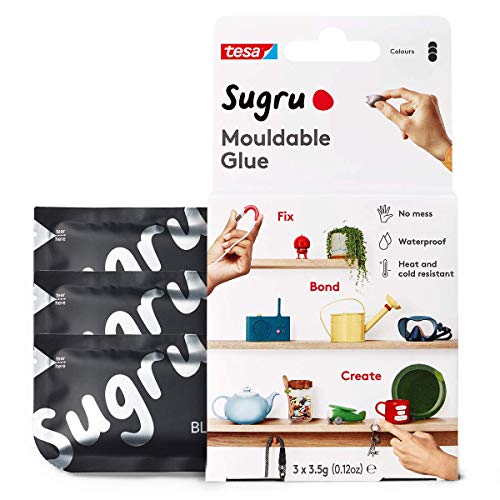
Sugru is a moldable adhesive silicone rubber putty used to fix pinched wires temporarily.
It will harden like a rubber-like outer jacket after curing.
Open the single-use Sugru, remove the silicone rubber putty, and squish it back and forth to make it comfortable for 30 seconds.
Warm it up and make it moldable.
Now, roll it to give it a long, thin rectangle shape by placing it back and forth with your fingers to wrap it around the pinched part of the wire.
Wrap it gently, press the edges where they meet, and smoothen it to remove the fingerprints.
If the pinched wire part is beside the wall or power adapters at the cable end, press the Sugru against the power block or charger for a smooth repair look.
Let the Sugru sit for 24 hours to let it cure. Hang the cable up so that it doesn’t touch anything.
Once the putty strengthens, it will make a flexible casing for the pinched wire part.
It will provide enough coverage to your exposed wires and relieve strain to prevent further damage.
3. Heat shrink tubing

Heat-shrink tubing is a shrinkable plastic tubing that helps to cover and insulate damaged and pinched wires.
For heating, use a hair dryer or a heat gun.
Take a 2:1 heat-shrink tube with a diameter extensive than the cable.
For example, if the cable is 1 mm in diameter, take a 2 mm shrink tube.
Once shrunk, the tube will shrink to the wire’s diameter and help to seal and repair the pinched part.
Measure the pinched part, double the measurement, and cut the tubing to double the damaged part’s size.
The tube needs to be 10-15% shorter after shrinking.
So cutting it twice the size will adequately cover the pinched area and on either side of the cable to prevent further damage.
Slide the tube over the pinched part and slip it over the cable’s end at the exposed wire.
Heat the tubing with a heat gun or hair dryer until it shrinks. Hold the heat gun’s tip within 1 cm of the tubing.
The tubing will shrink in 30 seconds or less.
It will stiffen the damaged part and protect it from further damage for quite a long time.
Avoid using an open flame to the shrink tubing as you can melt it and damage the cable more than before.
4. Repurposed spring
- The method involves:
- Removing a spring from a retractable pen.
- Stretching it out.
- Sliding it over the pinched wire part.
Wrap it around the cable and reinforce it towards one of the wire ends.
However, the spring is ineffective because they are weak when stretched out too much.
So they won’t be able to protect the wire.
Install the spring over the damaged area, followed by heat shrink tubing for better protection.
Permanent solutions for fixing a pinched wire: What to do when a quick fix doesn’t cut it
The fixes discussed above are some temporary fixes for a pinched wire.
However, they will last for a few years. After that, you may have to repeat the process.
This section will discuss a few permanent solutions for a severely damaged or pinched wire.
1. Cut the pinched parts and reconnect the wires.

If the wire has pinched close to the plug, you can remove the damaged part and connect the wire back to the plug.
To do this:
- Turn off the power at the circuit breaker.
- If the damage has happened close to the plug, remove the damaged part from close to the plug.
- Check the wire length and remove the shorter wire.
- Strip about 1 inch of insulation from the wire you will use to reveal the inner wires. There will be three wires inside the cords.
- Open the plug apart and see the screws inside it. Sometimes, there will be labels to connect the wires easily. If there aren’t any labels, check the screws.
- The orange brass screw is for the black hot wire, the silver screw is for the neutral wire, and the green screw is for the ground wire.
- Tuck the exposed wire ends into the respective screws, secure them by twisting the wire strands and wrap them around the screw. Make sure the exposed parts don’t touch each other.
- Turn the screws clockwise with a screwdriver and check them to ensure everything is positioned perfectly.
- Cover the plug with the housing cap and screw it in place. Slide the other half along the cord and onto the cap.
- Plug the cord into the outlet and test it.
- If it is working fine, everything is done correctly. Otherwise, immediately turn off the switch and remove the plug if you hear a hissing sound or smoke. Call an electrician for help.
2. Splice and solder the wires
For this method, you need a well-ventilated space that is heat-resistant.
- Take a PVC shrink tube and slide it inside the cable for later usage. A 1-inch tube is enough for most wires because it becomes the wire’s shape after heat.
- Take a 63/67 lead solder to join the wires. This solder will be made of 63% tin and 37% lead. It can melt at about 361°F.
- Turn off the power at the circuit.
- Cut out the pinched part of the wires and strip off a few inches of insulation from both ends. Based on the cord and appliance type, there will be more than one colored wire, for example, red, blue, or black.
- Twist the wire strands with the right color.
- Apply some rosin flux over the spliced wires to help the solder attach better to the wires.
- Melt the soldering iron over the top of the exposed wire parts and coat them. Hold the solder’s tip at a 45-degree angle. Make sure to melt only the solder and not the wires.
- Let the solder cool down for 2-3 minutes, and don’t touch them.
- Apply some silicone paste on the soldered wire to make it waterproof.
- Bring the heat shrink tube over the soldered wire part and heat it with a heat gun or hair dryer until it shrinks and seals the wire.
- Now, test the cord and see if everything works fine.
- This method is an excellent DIY permanent method to fix pinched wires. It will also prevent the wire from further damage.
- One of my friends has used the soldering method to fix a computer cord.
Ways to splice a pinched wire: Methods for repairing damaged wires
Splicing a wire means removing the damaged parts and combining two lengths of the wires to carry current as before.
If the pinched wire is not heavily damaged, splicing is not needed.
But, if the insulation has broken and the wires inside are exposed and damaged, splice the wires to fix them.
Before splicing the wires, turn off the power at the circuit, locate the pinched part, and examine the damage level.
If the wire is badly injured due to compression, remove the damaged part, and strip a few inches of insulation from both sides of the wires to expose the inner wires.
Twist these exposed wire strands to repair the damaged wires.
Below are a few ways to splice a pinched wire and fix it:
1. Using a wire nut

- Examine the damage level and cut the wires to remove the damaged parts.
- Strip around 1 inch of insulation from both the wire sides.
- Press and hold the exposed wire ends together to make them touch each other. Do not twist them; they won’t fit into the wire nuts.
- Set the wire cap over the exposed wires and start twisting a wire cap onto the exposed wires for 5 seconds until the wire wraps and coils inside.
- Gently tug the wires to see if they are correctly fitted into the cap.
- There is a spring inside the cap. Whenever you spin the wires inside the cap, they will become tighter around the wire.
- Strip off a few more inches of insulation if you need more wires to twist inside the cap.
- Wrap black electrical tape around the wire at the wire cap’s bottom to cover it completely.
- Overlap the tape layers by half to ensure no wires are exposed.
- Cut the tape and test the wires.
I once tried it for a radio cord, and it worked fine. However, I consulted with an expert before approaching. You should do the same if you are a beginner.
2. Butt splice
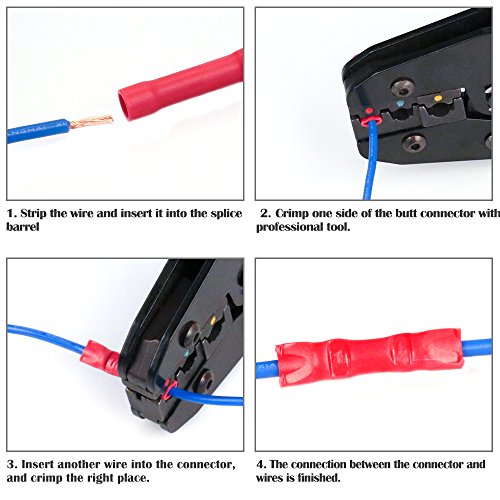
- Butt splices are small tubes with openings on two ends to slide in the wires.
- Insert one end of the spliced wire into one end of the butt splice and place it at the center.
- Push the exposed part until it reaches the center.
- Take a wire crimper one-quarter of the way from the splice’s end.
- Match the crimper’s hole to the butt splice size, and place the jaws properly ¼ to ½ inch from the butt splice edge.
- Squeeze it to ensure the wire is held in place.
- Put the second wire on the other side of the butt splice and crimp it similarly.
- Slide the shrink tube over the butt splice and apply heat.
- Plug in the wire and check its functionality.
Avoid using a crimp with a small hole, or you may cut through the wire.
Some butt splices are transparent, showing whether the exposed wire parts have appropriately entered the butt splice and when touching each other.
3. Lineman’s splice
Here, I will talk about soldering the pinched wires. I have already shared this in the previous heading. But let’s share it briefly.
- Cut the damaged wire parts and take out the wires from inside the insulation.
- Make a 90-degree angle or L-shape of the exposed wires with your fingers or needle-nose pliers.
- Hook the wires together to ensure the corners are touching.
- Now, coil and twist both wires. Make at least 3 coils.
- Take solder lead, and apply heat to solder the coiled wires.
- Let the solder cool down for a bit.
- Put a shrink tube over the soldered wires and apply heat to seal and shrink the tubing.
- You can put the wires inside a junction box and use a protective cover. Secure the wires with a screw.
- Check if they are well-sealed and connect the wire to the outlet to check its functionality.
How to fix a pinched wire without cutting: Techniques for preserving wire length

You will not want to cut the wires if a pinched wire’s length is short.
Instead, you need a method that helps preserve the wire length.
If the wire is poorly compressed by physical pressure, you have no option but to cut and repair it.
But, if the damage is slight and the inside wires are still intact inside the insulation, there are two ways to repair the wire without cutting it:
- You can wrap electrical tape over the pinched wire part to seal the wire and prevent it from further physical pressure.
- You can use heat-shrink tubing and apply heat until the tube shrinks. You do not have to cut the wires here.
If only a tiny part of the wire is damaged due to physical pressure, splice a small part and consider soldering or butt splices.
If the wire is long, cutting won’t shorten the wire length too much.
But, for shorter wires, try the electrical tape and heat shrink method and avoid pinching the wires further.
The steps are already explained in the above sections. So go through them to know the detailed process.
Pinched wires and electrical safety: When to call in a professional
All the above-mentioned methods will work well for fixing pinched or damaged wires.
Beginners might hesitate to approach these methods despite knowing them.
In that case, hire an electrician to fix the wires.
Call an electrician if the wires are so poorly damaged that the above processes don’t work out much for them.
Some common signs that indicate you need an electrician are:
- Burning odors
- Electrical shocks and sparks
- Buzzing or humming sounds
- Frequent tripping
- Excessive damage level in the wires
- Improper functioning of the appliances
If you ever witness these signs before or after fixing the pinched wires, unplug the appliance, turn it off, and call an electrician for help.
Inform him about the problems and steps you have taken to fix a pinched wire.
He will be able to understand the problem and provide you with the right solution.
Also, call the electrician if the pinched wires are of heavy-duty appliances like dryers, washing machines, refrigerators, etc.
Since they draw too much power, electricians will do their best to fix them properly without any issues.
Final thoughts
A pinched wire is a wire that gets compressed or squeezed due to physical pressure. If the wires are only squeezed, unpinch and bend them with your hands or pliers to return them to the proper position.
If the wires have been slightly damaged, try temporary solutions like electrical tape, Sugru, heat shrink tubing, and repurposed springs.
For a permanent solution, cut the wires and reconnect them to the plug’s screws, or splice and reconnect them with solder or wire nuts.
If needed, call an electrician.
How can I prevent the wires from getting pinched?
Use the wires gently and keep them away from heavy objects. Ensure the wires can be used flexibly and don’t stay between, behind, or under heavy objects.
How do I fix small wires?
If the wires are not severely damaged, use electrical tape or heat shrink without cutting the wire. But, if the wires are badly damaged, and you don’t know what to do, call an electrician.
Reference: Wire repair Wikipedia; Wire repair by splicing