The disconnect switch helps separate the electrical circuit from the main power source. It is good for larger appliances, but the wiring is the work of a professional. However, this guide can help you to learn the wiring procedure.
To wire an HVAC disconnect, find a proper location, choose the right disconnect type and size, prepare the wires and connect them to the disconnect, mount it in the location and check the grounding, and test the wires and connections for proper functionality.
Since it is the work of a professional, the steps will be complicated. This article will provide a detailed procedure guide to help you do it yourself. We will also share some common mistakes which you must avoid. So, let’s get into it right away.
Check out our list of top-handpicked products for all your electrical, appliance, and HVAC system needs to keep your home running smoothly.
This post includes some affiliate links.HVAC disconnect wiring: Key takeaways
An HVAC disconnect is a safety material that controls the unit’s power source and shuts it off when needed by interrupting the power connection.
Wiring an HVAC disconnect is very complicated.
That is why most people recommend wiring the disconnect by hiring a professional.
It ensures that all the wires connect to the proper terminals and are secured well.
You will have two wire sets – one from the electrical panel breaker, called the line wires, and the other from the outdoor unit, called the load wires.
What is a fused disconnect?
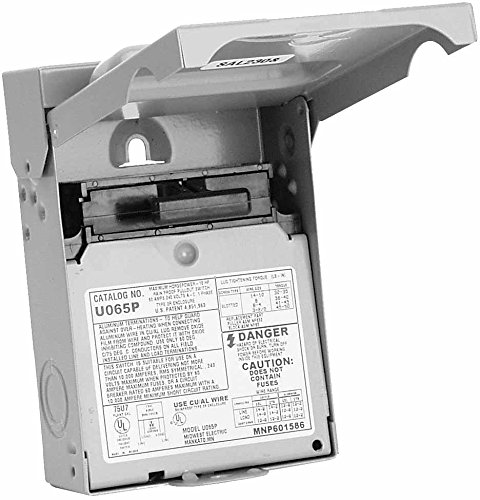
A fused disconnect has a combination of a switch and a fuse.
The switch helps to disconnect the circuit, and the fuse shuts off the circuit when any problem occurs.
The switch also allows you to shut off the power manually during installation or equipment maintenance time.
The fuse disconnects are best for high-voltage machines, including industrial equipment and process control systems.
The fuse contains a small filament to match the circuit’s current rating.
If the amp rating exceeds the fuse rating, the filament will melt and disconnect the circuit permanently.
Where is the AC disconnect located?
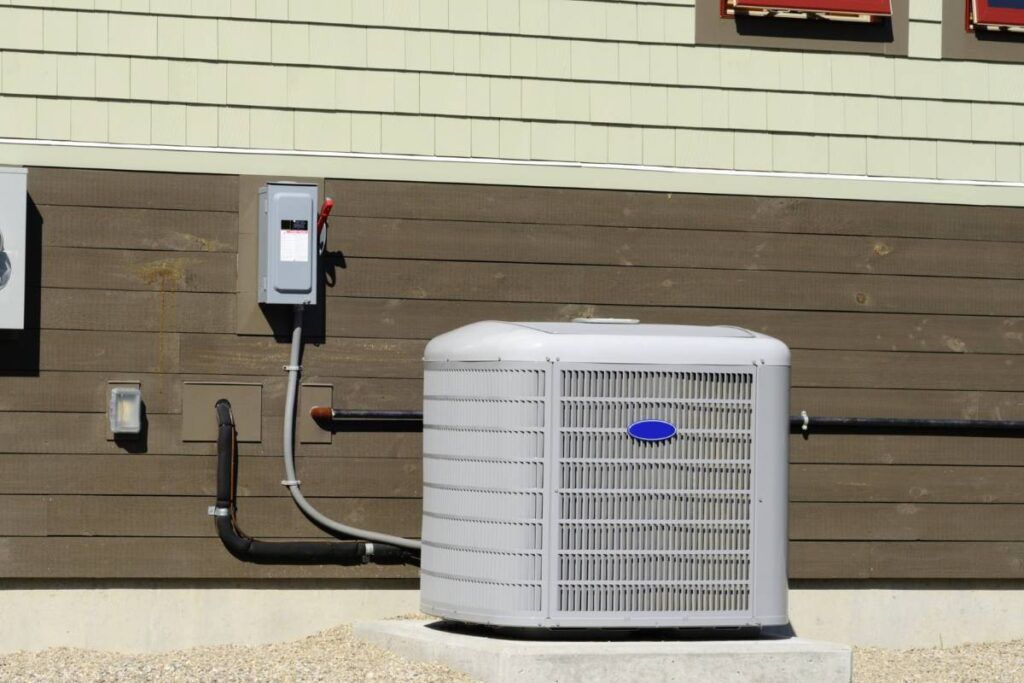
Generally, the AC disconnects are located on the exterior walls of your house near the electric meter or where the HVAC unit is installed.
The distance between the unit and the disconnect should remain short so that you do not have to run the wire for longer distances.
Short distances keep the resistance low.
How high should the disconnect be off the ground?
The disconnect should be located adjacent to the HVAC system.
The height limit of the disconnect switches is around 2.0 m, or 6 feet and 7 inches above the floor.
You should maintain a distance of at least 6 feet between the ground and the disconnect.
How to wire an HVAC disconnect?

Wiring a disconnect will need an expert’s help.
If you have little knowledge about it and want to wire it yourself, then here are the steps:
1. Identifying the proper location for the HVAC disconnect
Before you wire the disconnect, you must find a proper location to install it.
The disconnect has to be on the wall next to the HVAC unit.
Based on where you should put the wires in the box, you can remove the knock-out plugs after mounting the switch and tighten the cable connectors in the proper place.
If your HVAC unit already contains a disconnect, it has to be within reach of the existing cable.
It will let you use a short cable between the disconnect and the HVAC unit.
Short distances will also reduce voltage drop and resistance, which is good.
2. Choosing the right size and type of disconnect for the HVAC unit
Choosing the right size and type of disconnect is crucial in terms of safety.
You should choose the disconnect size according to the current used by your system, voltage, current requirements, application type, and mounting style.
Choose a disconnect with a suitable amperage rating. Since HVAC will carry the load, using a 20 amp disconnect will lead to frequent tripping.
Non-fused disconnects are ideal for residential and small commercial services.
These switches break and make electrical circuits, turn the load on or off, and give you good safety during the isolation.
Non-fused switches are less expensive and can restore power during an outage or overload.
If you have a circuit breaker at the panel, use a non-fused disconnect rated at 30 to 60 amps.
The amperage rating is high and enough for your HVAC system.
3. Preparing the wiring for the disconnect
After turning the breaker off, disconnect the wires and remove the cable from the electrical compartment of your HVAC system.
To install an HVAC system, there has to be a cable that should be installed from the disconnect so that it can reach the main electrical panel.
To prepare for the wiring, you should drill a hole through the wall to pull the cable and bring it inside.
You can also pre-drill the hole with a long drill to ensure its position instead of unpleasant future surprises.
When you need it, you can drill it bigger as needed.
Prepare the cable and feed line from the main panel by stripping 19mm insulation, exposing the wires to insert the cable into the cable connector, and clamping it into the disconnect box.
Cut another cable with 16-20 inches extra and prepare both ends similarly.
For units with conduit tubes, remove the plastic knock-out panel and create a slot where you can install the conduit.
The conduit depends on the wire size.
If you have a #10 AWG wire, you need a ½ inch conduit and ¾ inch conduit. Wire size depends on the size of your HVAC unit.
A 3-ton HVAC unit will need a 20 amp breaker and 12-gauge wires.
Units smaller than 3 tons will need a 15 amp breaker with 14-gauge wire.
Larger units need 60 amps breakers with 3 or 4-gauge copper or aluminum wires.
The conduit size will vary based on these wire sizes.
4. Connecting the wires to the disconnect
After the cutting process, insert one cable end into the HVAC’s electrical panel and the other into the disconnect switch.
Secure both ends with cable connectors.
Connect the wires to their terminals inside the HVAC’s electrical box by maintaining the proper color codes.
Inside the disconnect box, you will find a pullout switch after opening the cover.
You need to remove that double-contact pullout from the inside to open the contacts of the switch.
The red wires will go to one set of contacts, and the black wires will go to the other.
You can disconnect both by pulling a handle.
Connect the two ground wires to the ground terminals and the two white wires inside with a wire nut.
If it had been a 240V installation, you would have to use two-wire cables with ground wires to power the disconnect.
Here, the white and black will go to the contacts, and the ground will be in the ground block.
Mark the white wire with electrical tape to understand that it is not working as the neutral.
Once you have hooked up the disconnect, cover the box.
5. Mounting the disconnect in the appropriate location and ensuring that it is properly grounded
Now, you must connect the HVAC to the panel and mount it.
Turn off the panel’s main breaker to switch off the electrical appliances in the house.
Remove the front cover of the electrical panel and expose the wires and breakers.
After that, install a circuit breaker and secure it in place, being in the OFF position.
Remove the appropriate plug for wiring and install the cable connector.
Measure the wire lengths so that you can assure that they will reach the breaker’s terminal.
Use electrical tape and mark the cable’s jacket at 19mm length, cut the outer portion across the perimeter, and separate it from the remaining cable. Avoid slicing into the insulation.
Cut the jacket from the previous cut to the end to expose the black, red, white, and ground wires.
Pass the cable through the connector at least ½ inch of the jacket.
After the 19mm insulation removal, connect the bare wire to the ground bus bar and the black and red wire to each of the two terminals on the breaker.
Once you have properly connected all the wires, it is time to mount the disconnect.
The disconnect box will have a hook to secure it in place.
Plug the plates into the hole from the other end of the path to link and detach.
The plates will fall into the empty areas when you flip the switch off.
It will prevent the power from flowing to the HVAC via the panel.
6. Testing the wiring and connections to ensure proper operation
Now, it is time to test the wire connections.
To prevent power surges, switch all the breakers off inside the panel before turning on the main breaker.
Start with the main switch, all the circuit breakers, and the new breaker.
Then, please turn on the unit to check and verify its functionality.
Mistakes to avoid
If you are new to the wiring of the HVAC disconnect, you may make some mistakes.
Not only just a beginner but even electricians make these mistakes when they work in a hurry or carelessly.
Here are some common mistakes you must avoid while wiring the disconnect:
Not using the proper size and type of disconnect for the HVAC unit.

You should use a suitable disconnect size and type.
Using the wrong type of disconnect will not allow your unit to work.
The switch types differ for alternating and direct currents.
So, choose the one ideal for your HVAC.
Smaller disconnect sizes can lead to overloading.
So, go for slightly bigger ones.
Improperly grounding the disconnect.
Ground the disconnect properly. Since HVAC systems are heavy-duty appliances, you should have grounding for safety.
You cannot save yourself from electrocution and serious damage with improper grounding.
Not properly securing or protecting the wiring connections
You must secure and protect the wires with wire nuts.
Loose connections can lead to overheating, short circuits, and fire hazards.
So, before you turn on your unit, check the wire connections properly and fasten them tightly.
Not properly running conduit or pulling wire to hide the wiring
While preparing the wiring, you have a wire to install from the disconnect.
Make sure you pull the wire from the holes through the walls and bring it inside the panel.
If you do not pull the right wire properly through the holes, the disconnect might not work.
Besides, use a conduit because the wire should run through the walls.
Without the conduit, the cable can face physical damage and expose the wires.
Conduit will save from physical damages.
Not testing the wiring and connections before turning on the power.
Before turning on the power, check the wire connections and their tightness.
Check the steps to confirm that you have performed all the steps perfectly and secured all the steps properly.
This way, you can check if there are any mistakes. Otherwise, you may face issues or failures in the wiring process.
Final thoughts
Connecting the HVAC disconnect is complicated, and thus, people hire professionals. But, if you wish to do it yourself, follow the steps properly for successful wiring.
Avoid making the mistakes mentioned in the article for successful wiring. Always contact the experts if you hesitate to perform the wiring steps.
Avoid using metal disconnect boxes for the HVAC systems unless you live in an arid region. Metal boxes can rust quickly and are considered good conductors of electricity. So, avoid metal.
How do I check the fuses in the disconnect block?
Use a multimeter and set it to the lowest OHM scale. Place the black and red wire tips on either end of the fuse. The fuse is fine if the number is not zero or has minus or infinity symbols.
What will be the cost of installing an HVAC disconnect?
Installing an HVAC disconnect will cost around $200 to $400.
Reference: HVAC Wikipedia, Electrical wiring Wikipedia.